Contact me here! -->
The Tameless Shrew
  • Home
  • Blog
  • Quotes
  • Reviews
  • About Me
  • Contact

Crimping

4/3/2015

0 Comments

 
Picture
Remember when crimping was big when we were kids? Well, it's just as fun to do now! Plus, it looks super cute. When I went to Germany two years ago, it was pretty popular to crimp your hair. Recently, we had SAI spirit week. One of the days, we had to dress up like another SAI. I chose my grand-big, who has curly hair. I was too lazy to curl my hair with a curling iron, so I crimped it! It turned out really adorable, and I got a lot of compliments, so I am going to give you a tutorial on how to crimp your hair. 

Yes, they make crimpers, but who wants to buy another hair appliance?

Crimping is easy enough with braids. 

Materials:
-small hair ties 
-hairspray (optional)
-anti-frizz creme (optional)

1. Shower
In order to get your hair to crimp well, your hair needs to be damp. The best way to do this is shower and then wait a bit until your hair is somewhat dry, but still damp. 

2. Braid
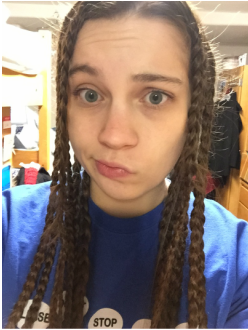
Braid your hair in tiny little braids and tie them off with the small hair ties. I used rubber bands. I would not suggest doing that, because I basically had to tear out my hair to get them out the next day. Just use hair ties that are made for your hair. Make sure to braid all of your hair like this, all the way up to your scalp. When you're done, it should look like the picture below (the braids can be smaller if you want. That is up to you).
Picture
3. Sleep on it
Go to bed! Crimping takes time if you do it this way! I did all the braiding the night before. 

4. Take out the braids
When you wake up in the morning, take out your braids at the end of your morning routine. Just so you know, you might want to add a little more time in your schedule to do this; it takes a little while to take out all those tiny braids. My roommate had to help me, otherwise I was going to be late to class. 

5. Brush you hair
Brush out you hair. It will probably bush out a bit. If that bothers you, you can use anti-frizz creme. Be careful when you do this though, because it will cause the texture to fall out sooner if you use too much. You don't want that. 

6. Hairspray
Hairspray your hair to make sure the texture holds! 

Viola! You now have gorgeous, crimped hair! Below is the finished look! 
Picture
Why do you want to crimp your hair? It's cute? Costume? Let me know! 
0 Comments

The Dress

3/22/2015

0 Comments

 
Picture
I have been panicking over getting a costume for my scene in Light Opera Works, which is a student run organization on campus. I am in a trio and singing a piece from The Hot Mikado, which is a jazz version of Gilbert and Sullivan's The Mikado. It is a great piece and I am super excited to do it, but I had the hardest time finding a costume! My director wanted us to wear dresses that look like the 1940s and are different solid colors. One of the girls had a bunch of dresses that fit these requirements, and the other one was the same size so they had that figured out immediately. 

It was much harder for me. 

I like the clothing from the 1940s, but I do not own anything that looks like the fashion of that time period. Naturally, I looked online. Everywhere. The biggest problem was that I had to find a dress that was not red or blue, which was the other two girls' colors. Unfortunately, those colors seem to be the most popular in that time period... I eventually found an adorable light green dress, but on closer look, I realized it had polka dots. Every other dress that I found had some sort of print, or wasn't in my size. I was so upset!

It took me hours! Eventually, I turned to the girl with all the dresses and she found a few in seconds. Should have done that in the first place, right?? I am so relieved. It cost a little bit more than I wanted to pay for it, but hopefully I will be able to use it again for recitals, or at least for Halloween costumes. 

Here is what it looks like! If you want to check it out at the website, click the picture! 
Picture
It is pretty cute! I hope that it fits! With my luck it will be too small... Let's cross our fingers! 

Just so you know, the website I bought this dress from is called Rose Wholesale. I have never bought from there before, but now that I have gotten the chance to look through it, it looks a lot more reasonably priced than other websites like this. Just a warning: if you want to buy from there, the sizes apparently run small (which is why I am a little nervous). I'm not entirely sure how small they go. I bought an XL (the biggest option). I am generally a L or XL. I am hoping for the best! I will update this post when it comes and tell you if it fits or not! 

Do you ever buy retro or vintage clothing? Where do you buy it? 
0 Comments

 The Natural Look Make-up Tutorial

2/14/2015

0 Comments

 
Picture
Today is Valentine's Day. Whether you are going out with friends or with a significant other, you ladies out there (or gentlemen, I don't judge!) will probably want to put on make-up, even if that is normally not your thing. Today is a special enough occasion that you want to feel nice, but not go all out. That is why the natural look is perfect! It covers up any skin imperfections, and just makes you feel confident in your own natural look. 

I went to a Mary Kay make-up party today, so I can easily say that their make-up is great quality and not too expensive! You can buy some Mary Kay make-up here. If you can, try to find your local consultant and buy from them because they get half of the profit. It is a great way to support someone who is working towards their own goals. If you can't afford Mary Kay, drug store make-up will work too. 

Here's what you need: 
-Baby wipes
-Q-tips
-Liquid and powder foundation (Make sure it matches your skin tone!)
-Brush for the powder foundation and blush 
-Any other brush you want for other make-up products that we will be using (I usually just use my finger)
-Black eyeliner
-Two shades of brown/tan or flesh-colored eyeshadow (One needs to be darker than the other. It needs to contrast, but don't go too dark. I like to go a shade or two darker than my skin tone for one, and a shade lighter or white for the other.) 
-Black mascara
-Light pink blush 
-Light pink lip gloss

1. Apply the liquid foundation 
Put a dab of foundation on your finger, or a little bit on a foundation brush. Start from the bottom of your face and rub gently in circles in an upwards and outwards motion (you want to go against gravity). Don't forget to blend up to your ears and to do your chin and under your nose. Finish up by starting in the middle of your forehead and moving outwards and to your temples. Clean your hands with a baby wipe. 

2. Apply the powder foundation
This works in the same way as the liquid foundation, but using a brush this time. I use both powder and liquid foundation because it creates a softer and more smooth look. It also hides any mess-ups. Make sure that your foundation is well blended. 

3. Apply eyeliner
Start with the top. Take the finger of your non-dominant hand and place it on the outer corner of your eye. Gently pull outwards so that you can see your whole lash line. In light and short strokes, start in the middle of your lash line and move outwards. Try not to make it too thick and make sure that it is applied where your eyelashes come out of your lid. You don't want to see your skin between your eye and your eyeliner; it looks weird. Then finish it up by doing starting in the inner corner of your eye and make very thin lines towards the center. Repeat with the other eye. If you smudged, take a Q-tip and clean up a little. I usually wet the Q-tip a little with my tongue, place the Q-tip on the smudge and spin it. This helps because it doesn't smudge your eyeliner any further. Clean your hands if they got dirty again. 

4. Eyeshadow! 
This is my favorite part. Take the lighter shade and use your finger to apply it to your entire eyelid. Make sure that you get into the creases. Next, take the darker shade and start at the outer corner of your eye and move to the center of the eye. It should create a nice gradient. If you have an obvious line in the center of your eye, use a clean finger and DAB not rub the line until it is blended. Repeat with the other eye. If you go outside the lid of your eye, that is totally okay, as long as it is the same as the other eye. Use a baby wipe to clean up your hands. 

5. Apply Mascara 
You probably got some eyeshadow on your eyelashes. That is okay! Mascara covers that up! Take your mascara wand and carefully start at the base of your top eyelashes, starting from above (you will be doing the top of your eyelashes and moving downwards first). As you move downwards, also move side to side to avoid clumping. Now you will do the underside of your top eyelashes. Hold your brush still at the base of your lashes and blink. If it clumps, do the side to side motion with your wand again. Repeat with the other eye. I usually do the bottom lashes too, but it is totally optional. You start at the base of your lashes again, and carefully move downward. If you hit your skin, don't use your finger to wipe it up! Wait until you are done applying your mascara to take a Q-tip and remove it the same way you did with the eyeliner. 

6. Apply Blush
Use your brush and apply the blush to your cheekbones, blending upwards towards your temple. Match it on your other cheek. 

7. Apply Lipgloss!
I usually do my bottom lip first, put a little bit on the top lip, and then rub my lips together. 

Viola! Now you are ready to show the world how beautiful you are! 

What are some tricks that you like to do with make-up? 
0 Comments

    Author

    Kate Shrew
    B.M. Vocal Performance
    B.A. German

    Archives

    August 2015
    July 2015
    May 2015
    April 2015
    March 2015
    February 2015
    January 2015

    Categories

    All
    Advise
    Apps
    Beauty
    College/School
    Confidence Boost
    Crafts
    Food
    Funny
    Greek Life
    Health
    Holidays
    Knitting
    Music
    Nature
    Photography
    Reading
    Thoughts
    Vacation

    Subscribe to our mailing list

    * indicates required
    The Tameless Shrew - Blog
    Subscribe to The Tameless Shrew - Blog by Email
    Subscribe in a reader
Powered by Create your own unique website with customizable templates.